
Photo by Author
Introduction
Continuous Integration is the first step to CD where it runs automated tests in the main code branch to ensure that bugs are detected early and prevent the system from breaking when new codes are integrated.
In this article, I will provide a guide on how you can adopt continuous integration and automated testing with microservices and GitHub Actions CI-docker workflow.
How it works
Microservices are containerized using Docker thus, we develop a CI-docker workflow to help us build and conduct automated testing.
The CI solution contains 2 stages:
- Source In this stage, developers commit and push changes to GitHub
- Build & Test In this stage, a workflow engine is triggered when a pull request (PR) to develop a branch is made OR code is pushed to a develop branch PR. The workflow engine would build and spin up the docker containers and automated testing will be conducted by running through the test cases that were created. Once the workflow has been completed, a notification will be sent to slack indicating the status of the build.

CI Workflow
Overview of Testing System and Architecture
Before we move on to how the workflow is set up, I’ll provide a brief overview of the testing system and architecture to help you better understand the rationale behind the following steps.
NGINX Proxy Server
A proxy server acts as an API gateway that allows the outside world to reach the microservices via the proxy server by upstreaming the requests to the respective microservice. It can be set up using NGINX docker image in your docker compose file.
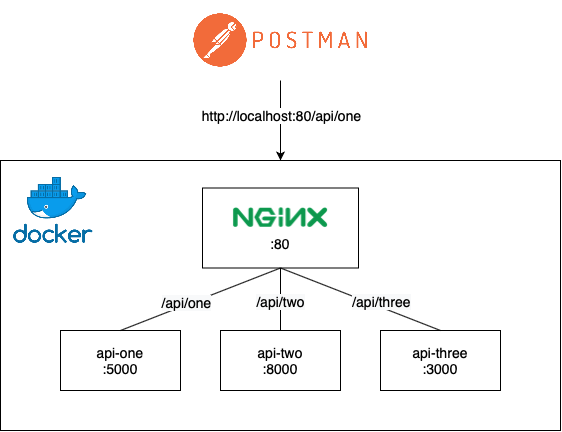
NGINX as API Gateway
MongoDB as database
For testing database, mongo is set up in docker compose file as well using mongo docker image. This ensures that the development or production database will not be diluted with testing data.
JEST
JEST is a Javascript testing tool used to develop API test suites together with Frisby.
Setting up a workflow with GitHub Actions
Now that you have gotten a gist of how the CI pipeline works, let’s delve deeper into the set up!
Creating a workflow
Head over to GitHub Actions to create a new workflow where you will be asked to create a workflow template and select Simple workflow (actions/starter-workflows). Follow the steps given by GitHub and you should see a .github/workflows folder created in your repository. I have named my workflow file as build.yml .

Creating a workflow
Set up runner
Your build.yml file contains the steps required for the workflow. As we would be utilising docker commands to spin up the containers, we need to run the environment using an image lucasalt/act_base created by LucasCtrl. Without this, we will not be able to run docker-compose which is required to spin up the containers. Next, include path as the name of your repository.
name: CI-dev-pipeline
on:  # Triggers the workflow on push or pull request events but only for the develop branch
    push:
        branches: [ develop ]
    pull_request:
        branches: [ develop ] # to change to developjobs:
    build:
        # The type of runner that the job will run on
        runs-on: ubuntu-latest
        container:
            image: lucasalt/act_base:latest
        steps:
        # Checks-out your repository under $GITHUB_WORKSPACE, so your job can access it
            - uses: actions/checkout@v2
              with:
                path: "<INSERT_NAME_OF_REPOSITORY>"
- name: RunOne
  run: |
    echo Hello, world!
Set up GitHub Actions Locally
Step 1: Installing Act
Due to the limited build minutes we have on GitHub actions, it’s always good to conduct a test run of the workflow locally. We can do so by installing act to run GitHub actions locally.
Step 2: Obtaining GitHub Token
Before we run act, we need to obtain a github token for authentication purposes. Head over to Settings > Developer Settings > Personal access tokens to generate a github token if you do not have one.
Step 3: Running act
After installing, use the GitHub token that you have obtained previously and run the following command in your terminal
act -s GITHUB_TOKEN=<YOUR_GITHUB_TOKEN>You will be given a choice to select the type of docker image. For testing purposes, we will select micro. Once selected, it will run your workflow accordingly. By default, it triggers push event workflow. If successful, you should be able to see “Hello world” as we have indicated in the previous section.
Setting up Build Stage
Now that you’ve gotten your GitHub Actions to work locally, use it as much as you can for testing before pushing to GitHub.
Build docker containers
In your build.yml, run your docker compose file to start building the containers in GitHub Actions environment which allows us to run our automated tests against. I have used docker-compose.test.yml to build containers in a test environment locally, you can replace it with the docker compose file that you have set up for your containers.
- name: Build docker
  run: |
    echo ---Building and starting up docker---
    docker-compose -f ./<REPO_NAME>/docker-compose.test.yml -p testing up -d
    echo ---Containers up---
Setting up Test stage
As Github Actions runs the workflow in a user-defined network, we need to containerize the testing folder to be in the same network as other microservices for communication to happen. Containers in separate networks are unable to communicate thus, API test cases will not be able to get a response from the microservices. Read more about docker networking here.
Containerizing testing folder
Create a docker-compose.test-github.yml file to spin up api-test container. API_URL is set to the container name of your proxy server, in this case, I’m using proxy. Similarly for MONGO_URL.
version: '3'
services:  api-test:
container_name: api-test
build:
    dockerfile: Dockerfile
    context: ./testing
    command:
        bash -c "npm run test; npm run test-failure"
    networks:
        - <YOUR_USER_DEFINED_NETWORK>
    environment:
        - API_URL=http://proxy:80
        - MONGO_URL=mongodb://mongo:27017/<DB_NAME>
    ports:
        - '4000:4000'
Modify the API URL and database URL in your config file accordingly to allow test cases to run locally and in a docker container.
exports.config = {
    "url": process.env.API_URL || "http://localhost:80",
    "mongoClient": process.env.MONGO_URL || "mongodb://localhost:27017/<DB_NAME>",
};
A Dockerfile is also created in testing folder to build api-test container, install relevant packages, and exposing them as port 4000.
FROM node:10

RUN mkdir -p /usr/src/app

WORKDIR /usr/src/app

COPY package.json /usr/src/app

RUN npm install

RUN npm install jest --global RUN npm audit; exit 0 && npm audit fix

COPY . /usr/src/app

EXPOSE 4000
Running test suites with docker
We will now modify the build.yml to spin up the api-test container using docker-compose.test-github.yml that we have created previously. Test cases will run upon starting up the container.
- name: Run test
  run: |
    echo --- Running test cases ---
    docker-compose -f ./<REPO_NAME>/docker-compose.test-github.yml -p testing up --build --exit-code-from api-test
    echo --- Completed test cases ---
Feedback using Slack Notifications
Step 1: Create a Slack app
Firstly, we would need to generate a SLACK_WEBHOOK_URL to send a notification to your Slack channel. Slack provides a seamless experience for you to create a Slack app, you can start creating one here.
Step 2: Store webhook URL in GitHub Secrets
Once you have generated a SLACK_WEBHOOK_URL , add them into your GitHub secrets under settings.
Step 3: Modify build.yml
Using simple-slack-notify@master, we can send a success/failed notification to Slack while including additional details such as branch name, repository name etc. with GitHub’s environment variables.
- name: Send slack notification
  if: always()
  uses: edge/simple-slack-notify@master
  env:
    SLACK_WEBHOOK_URL: ${{ secrets.SLACK_WEBHOOK_URL }}
    with:
        channel: '#deployment'
        status: ${{ job.status }}
        success_text: Build completed successfully
        failure_text: 'Build failed'
        cancelled_text: 'Build was cancelled'
        fields: |
            [{ "title": "Repository", "value": "${env.GITHUB_REPOSITORY}", "short": true },
            { "title": "Branch", "value": "${env.BRANCH}", "short": true },
            { "title": "Action URL", "value": "${env.GITHUB_SERVER_URL}/${env.GITHUB_REPOSITORY}/actions/runs/${env.GITHUB_RUN_ID}"}]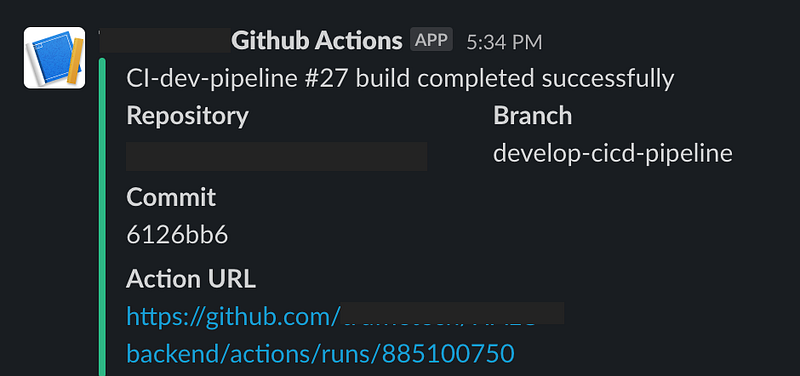
Sample Screenshot of Build Success Status Notification
Putting it all together
Once you have made a pull request or a push to dev branch, you can view the workflow in action by heading to Actions tab in your GitHub Repo.

Workflow in action!
Here is the gist of how we have set up build.yml so far!
Word of Appreciation
Big thanks to Truffle Technologies for giving me the opportunity to explore my design-thinking skills while working on the CI/CD project during my summer internship!
Thanks for reading this far!
This article has been fairly long and if you’ve read this far, I hope you have learned a thing if not two. In part 2 of this series, I will share more on Continuous Deployment with AWS ECR, Fargate and GitHub Actions.