
Photo By Author
Introduction
Continuous Integration and Continuous Delivery are essential to achieving a more efficient process of rolling out features to the consumers of your application. We may encounter situations whereby there are multiple pull requests undergoing automated testing. A fully automated deployment process would deploy each pull request (PR) once it has passed the automated testing. However, if you are deploying docker images, it could be a time consuming process which would be wasteful on our free build minutes that GitHub has given us especially if you are on a tight budget (like me!). In situations like this, how can we deploy the features to the development environment once all the pull requests have been merged safely?
GitHub Action’s workflow dispatch does exactly the trick for us. In this article, I will share how workflow dispatch could help push Docker images to AWS Elastic Container Registry (ECR) and deploying them to AWS Elastic Container Service (ECS) Fargate seamlessly, while managing the version of the application. If you have not read how we can adopt continuous integration and automated testing with GitHub Actions, you can read all about it in Part 1 of this article.
How it works?
Overview
We will be leveraging GitHub Action’s workflow dispatch whereby we can trigger the deployment process manually once all the PRs have been merged. Another advantage it has is it allows us to customise input information which in this case, could help us manage the versioning of the application with ease. Once we run the workflow, it will kickstart the deployment process and all we need to do next is to wait for it to be done!
Screenshot of GitHub Actions Workflow Log
You can track your deployment activity on GitHub as well where any failed or successful deployment will be reflected here.

Screenshot of GitHub Deployment Activity Log
Workflow
In addition to what was mentioned in Part 1, this would be the overall workflow of our CI/CD pipeline that we will be achieving! It looks like a challenge but I hope it’s something that would get you excited to work on it.
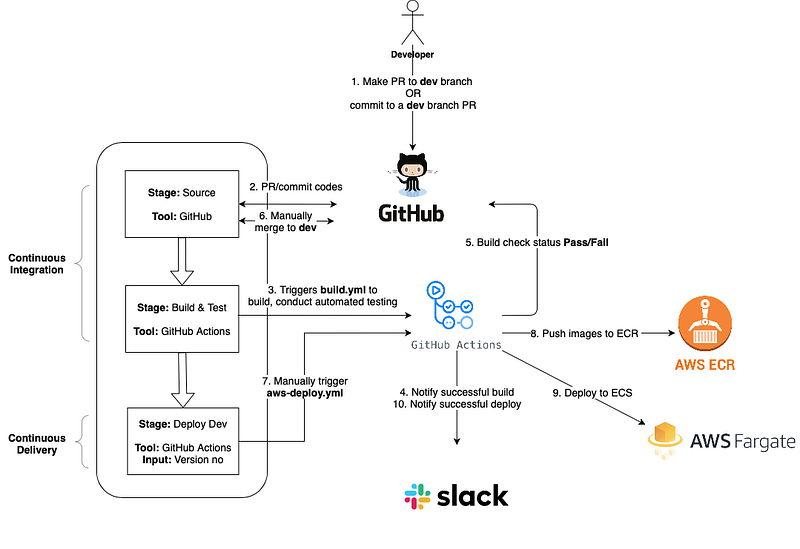
CI/CD Workflow Diagram
One important point that is worth noting is people often get confused between continuous delivery and continuous deployment. This article here provides a very good summary of their differences which I encourage you to check out if you would like to gain a better understanding of CI/CD.
Resources
Here is a summary of the files and environment variables that we will be using for this set-up.
Files used
aws-deploy.yml— contains the workflow that is triggered manually to deploy to AWS dev environmentdeploy.json— contains the list of container names that should be deployeddeploy.sh— deployment script that contains functions that will be used to push images to AWS ECR and deploying to AWS ECS
GitHub Secrets used
- AWS_ACCESS_KEY_ID
- AWS_SECRET_ACCESS_KEY
- AWS_ACCOUNT_ID
- SLACK_WEBHOOK_URL
Version Management
Healthcheck is an important tool that helps ensure that our application is up and running. To extend its purpose, it can also be a way to track the version of the application by including the version number as the response of your healthcheck API output. The API_VERSION_NO can be obtained from the version that you have specified when triggering the workflow. In the next section, I will explain how you can actualise it.
healthCheck(req, res) {
  return res.status(200).send({
    versionNo: process.env.API_VERSION_NO
  })
}
Setting Up GitHub Workflow Dispatch
Before we create our deployment script, we will first create a workflow dispatch that allows us to trigger the deployment workflow manually. In your .github/workflows folder, create a file named aws-deploy.yml .
1. Deployment Inputs
This is where you get to set up inputs when triggering the deployment workflow. In our case here, we would like to include the version number.
on:
  workflow_dispatch:
    inputs:
      VERSION:
        description: 'Version number'
        default: '0.154'
        required: true
        name: Deploy to Amazon ECS Dev
2. Environment Variables
Next include all relevant environment variables such as inputs, GitHub secrets and GitHub environment variables e.g. BUILD_ID to keep track of the deployment ID.
jobs:
  deploy:
    name: Deploy
    runs-on: ubuntu-latest
    container:
    image: lucasalt/act_base:latest
    environment: development
    env:
      AWS_REGION: ap-southeast-1
      APP_NAME: "app"
      AWS_ECR_ADDRESS: ${{ secrets.AWS_ECR_ADDRESS }}
      AWS_ACCOUNT_ID: ${{ secrets.AWS_ACCOUNT_ID }}
      VERSION: ${{ github.event.inputs.VERSION }}
      BUILD_ID: ${{ github.run_number }}
3. Installing dependencies
As we will be running awscli and jq commands for our deployment later on, we would need to install these dependencies in this step. Note that we will be using awscliv2 for this.
steps:
  - name: Install sudo package
    run: apt update && apt install sudo

  - name: Installing packages
    run: |
      sudo apt-get update -y
      sudo apt-get install jq curl -y
      curl "<https://awscli.amazonaws.com/awscli-exe-linux-x86_64.zip>" -o "awscliv2.zip"
      unzip awscliv2.zip
      sudo ./aws/install
4. Configure AWS Credentials
Authentication is our next important step as we need to be authenticated with AWS before we can run our deployment script. Using awscliv2 that we have installed in our previous step, we will configure our credentials with AWS_ACCESS_KEY_ID and AWS_SECRET_ACCESS_KEY obtained from GitHub Secrets.
- name: Configure AWS credentials
  run: |
    aws configure set aws_access_key_id "${{ secrets.AWS_ACCESS_KEY_ID }}"
    aws configure set aws_secret_access_key "${{ secrets.AWS_SECRET_ACCESS_KEY}}
    aws configure set region "$AWS_REGION"
    aws configure set output json
5. Deployment
Lastly, there are 2 steps to this deployment process:
- Building and pushing images to ECR
- Deploying images from ECR to AWS ECS
We would need to pass along ECR and version information into our script for authentication and version tracking.
- name: Push to ECR
  run: |
    cd app
    sh deploy.sh build-to-ecr $AWS_REGION $APP_NAME $AWS_ECR_ADDRESS $AWS_ACCOUNT_ID $VERSION $ACCOUNT_TAG $BUILD_ID

- name: Deploy to Fargate
  run: |
    cd app
    sh deploy.sh deploy
Setting Up Deployment Script
We’re done with getting our workflow set up! 🎉 . Next, we would need to create a deployment script called deploy.sh in your root folder to create functions that can aid our deployment workflow. This deployment script contains functions that will be called by our aws-deploy.yml workflow.
1. Authenticating ECR
Firstly, we would need to authenticate with AWS ECR using our AWS credentials which was passed from our aws-deploy.yml workflow.
# ENV variables from Github Workflow
AWS_REGION=${AWS_REGION}
AWS_ECR_ADDRESS=${AWS_ECR_ADDRESS}
AWS_ACCOUNT_ID=${AWS_ACCOUNT_ID}
APP_NAME=${APP_NAME}
VERSION_NO=${VERSION_NO}
ECR_SERVICE_URL="${AWS_ACCOUNT_ID}.${AWS_ECR_ADDRESS}"
VERSION_TAG="latest"
BUILD_ID=${BUILD_ID}

set -e # exit early if issues arise

aws ecr get-login-password --region ap-southeast-1 | docker login --username AWS --password-stdin ${ECR_SERVICE_URL}
2. Building Images and pushing to ECR
As we will be deploying multiple containers, jq makes our life easier by allowing us to loop through the list of containers in deploy.json that we would need to build in our script.
These are the key steps that this function will make:
- Build our images and set
api_version_noas the build argument. By doing so, you are able to set the version number as an environment variable to be used for the healthcheck API. - We will tag the image version as
latestas we would want our ECS to deploy the latest image uploaded. - Push the images to the respective repository. Depending on the task definition that you have set in ECS, your
ECR_REPOSITORY_NAMEmay differ from this. Do modify them accordingly to ensure that your ECS is able to obtain the correct image to deploy.
# build images and push to ECR
if [ “$1” = “build-to-ecr” ];then
  echo "AWS Account: "${ACCOUNT_TAG}  echo "building the docker images..."
  for row in $(jq -c '.[]' deploy.json); do
    _jq() {
      echo ${row} | jq -r ${1}
    }        C
    ONTAINER_NAME=$(_jq '.containerName')
    # create all docker images and push all to ECR
    ECR_REPOSITORY_NAME=${APP_NAME}_${CONTAINER_NAME}
    ECR_REPO_URL="${ECR_SERVICE_URL}/${ECR_REPOSITORY_NAME}"
    aws ecr create-repository --repository-name ${ECR_REPOSITORY_NAME:?}
    docker build --tag ${CONTAINER_NAME}:${VERSION_TAG} \\
    --build-arg api_version_no=${VERSION_NO}-${BUILD_ID} \\
    .

    docker tag ${CONTAINER_NAME}:${VERSION_TAG} ${ECR_SERVICE_URL}/${ECR_REPOSITORY_NAME}:${VERSION_TAG}
    # Push the image to ECR
    docker push ${ECR_SERVICE_URL}/${ECR_REPOSITORY_NAME}:${VERSION_TAG}
  done
fi
Once the images have been pushed, you should be able to view them in AWS ECR.

Screenshot of AWS ECR
3. Deploying to AWS ECS
Finally, take note of the name of your ECS cluster that you have created in AWS, you would need to specify the cluster and service that you would like to update.
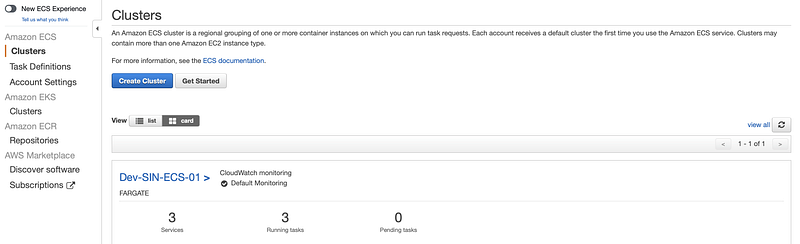
Screenshot of AWS ECS Cluster
By running the following function in your deploy.sh script, AWS ECS will deploy the images to Dev-service-01-users service in the Dev-SIN-ECS-01 cluster.
if [ "$1" = "deploy" ];then
  aws ecs update-service --force-new-deployment --cluster Dev-SIN-ECS-01 --service Dev-service-01-users
fi
Deployment In Action
Now that we are done with the set up, we can start our deployment!
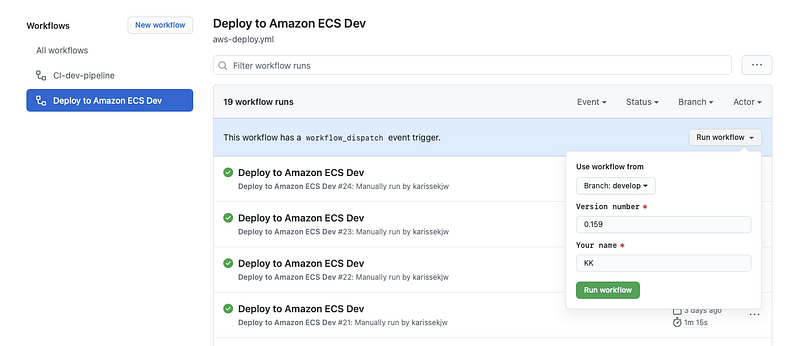
- Head over to GitHub > Actions > Deploy to Amazon ECS Dev (Workflow) > Run workflow
- Ensure that you are using workflow from develop branch as that is our main branch which contains the most updated source codes that we would want to deploy
- Include version number in the input
- Click on “Run workflow” and the deployment process should begin.
- Once the deployment is successful, a slack notification will be sent. It takes time for the ECS tasks to provision and run ~7mins
- Once the new tasks are up and running, run the healthcheck API on postman (or your browser) to determine if the newest version has been deployed successfully.
Word of Appreciation
Big thanks to Truffle Technologies for giving me the opportunity to explore my design-thinking skills while working on the CI/CD project during my summer internship!
Final Notes
Thanks for making it till the end of the guide! So far, we have covered continuous integration and continuous delivery with automated testing, GitHub Actions and AWS. As with all solutions, it isn’t a one-size-fits-all solution but I hope it’s a good enough skeleton to help you get started on CI/CD.