Introduction
$20. I was surprised by what I saw when I checked the session cost. I’ve done a similar kind of task before for $6 on a different codebase, so why does it cost $20 now?
I wasn’t going to let that $14 difference slide. To understand what was happening, I set up mitmproxy and inspected the requests that Claude Code was sending. By intercepting and analyzing them, I uncovered a subtle but costly behaviour: large tool outputs were added into the conversation context, quietly burning tokens in the background. The culprit? Context management (the information that gets included in the model’s context window on every request — read more here) and specifically, what was accumulating without me realising it.
Intercepting Requests With mitmproxy
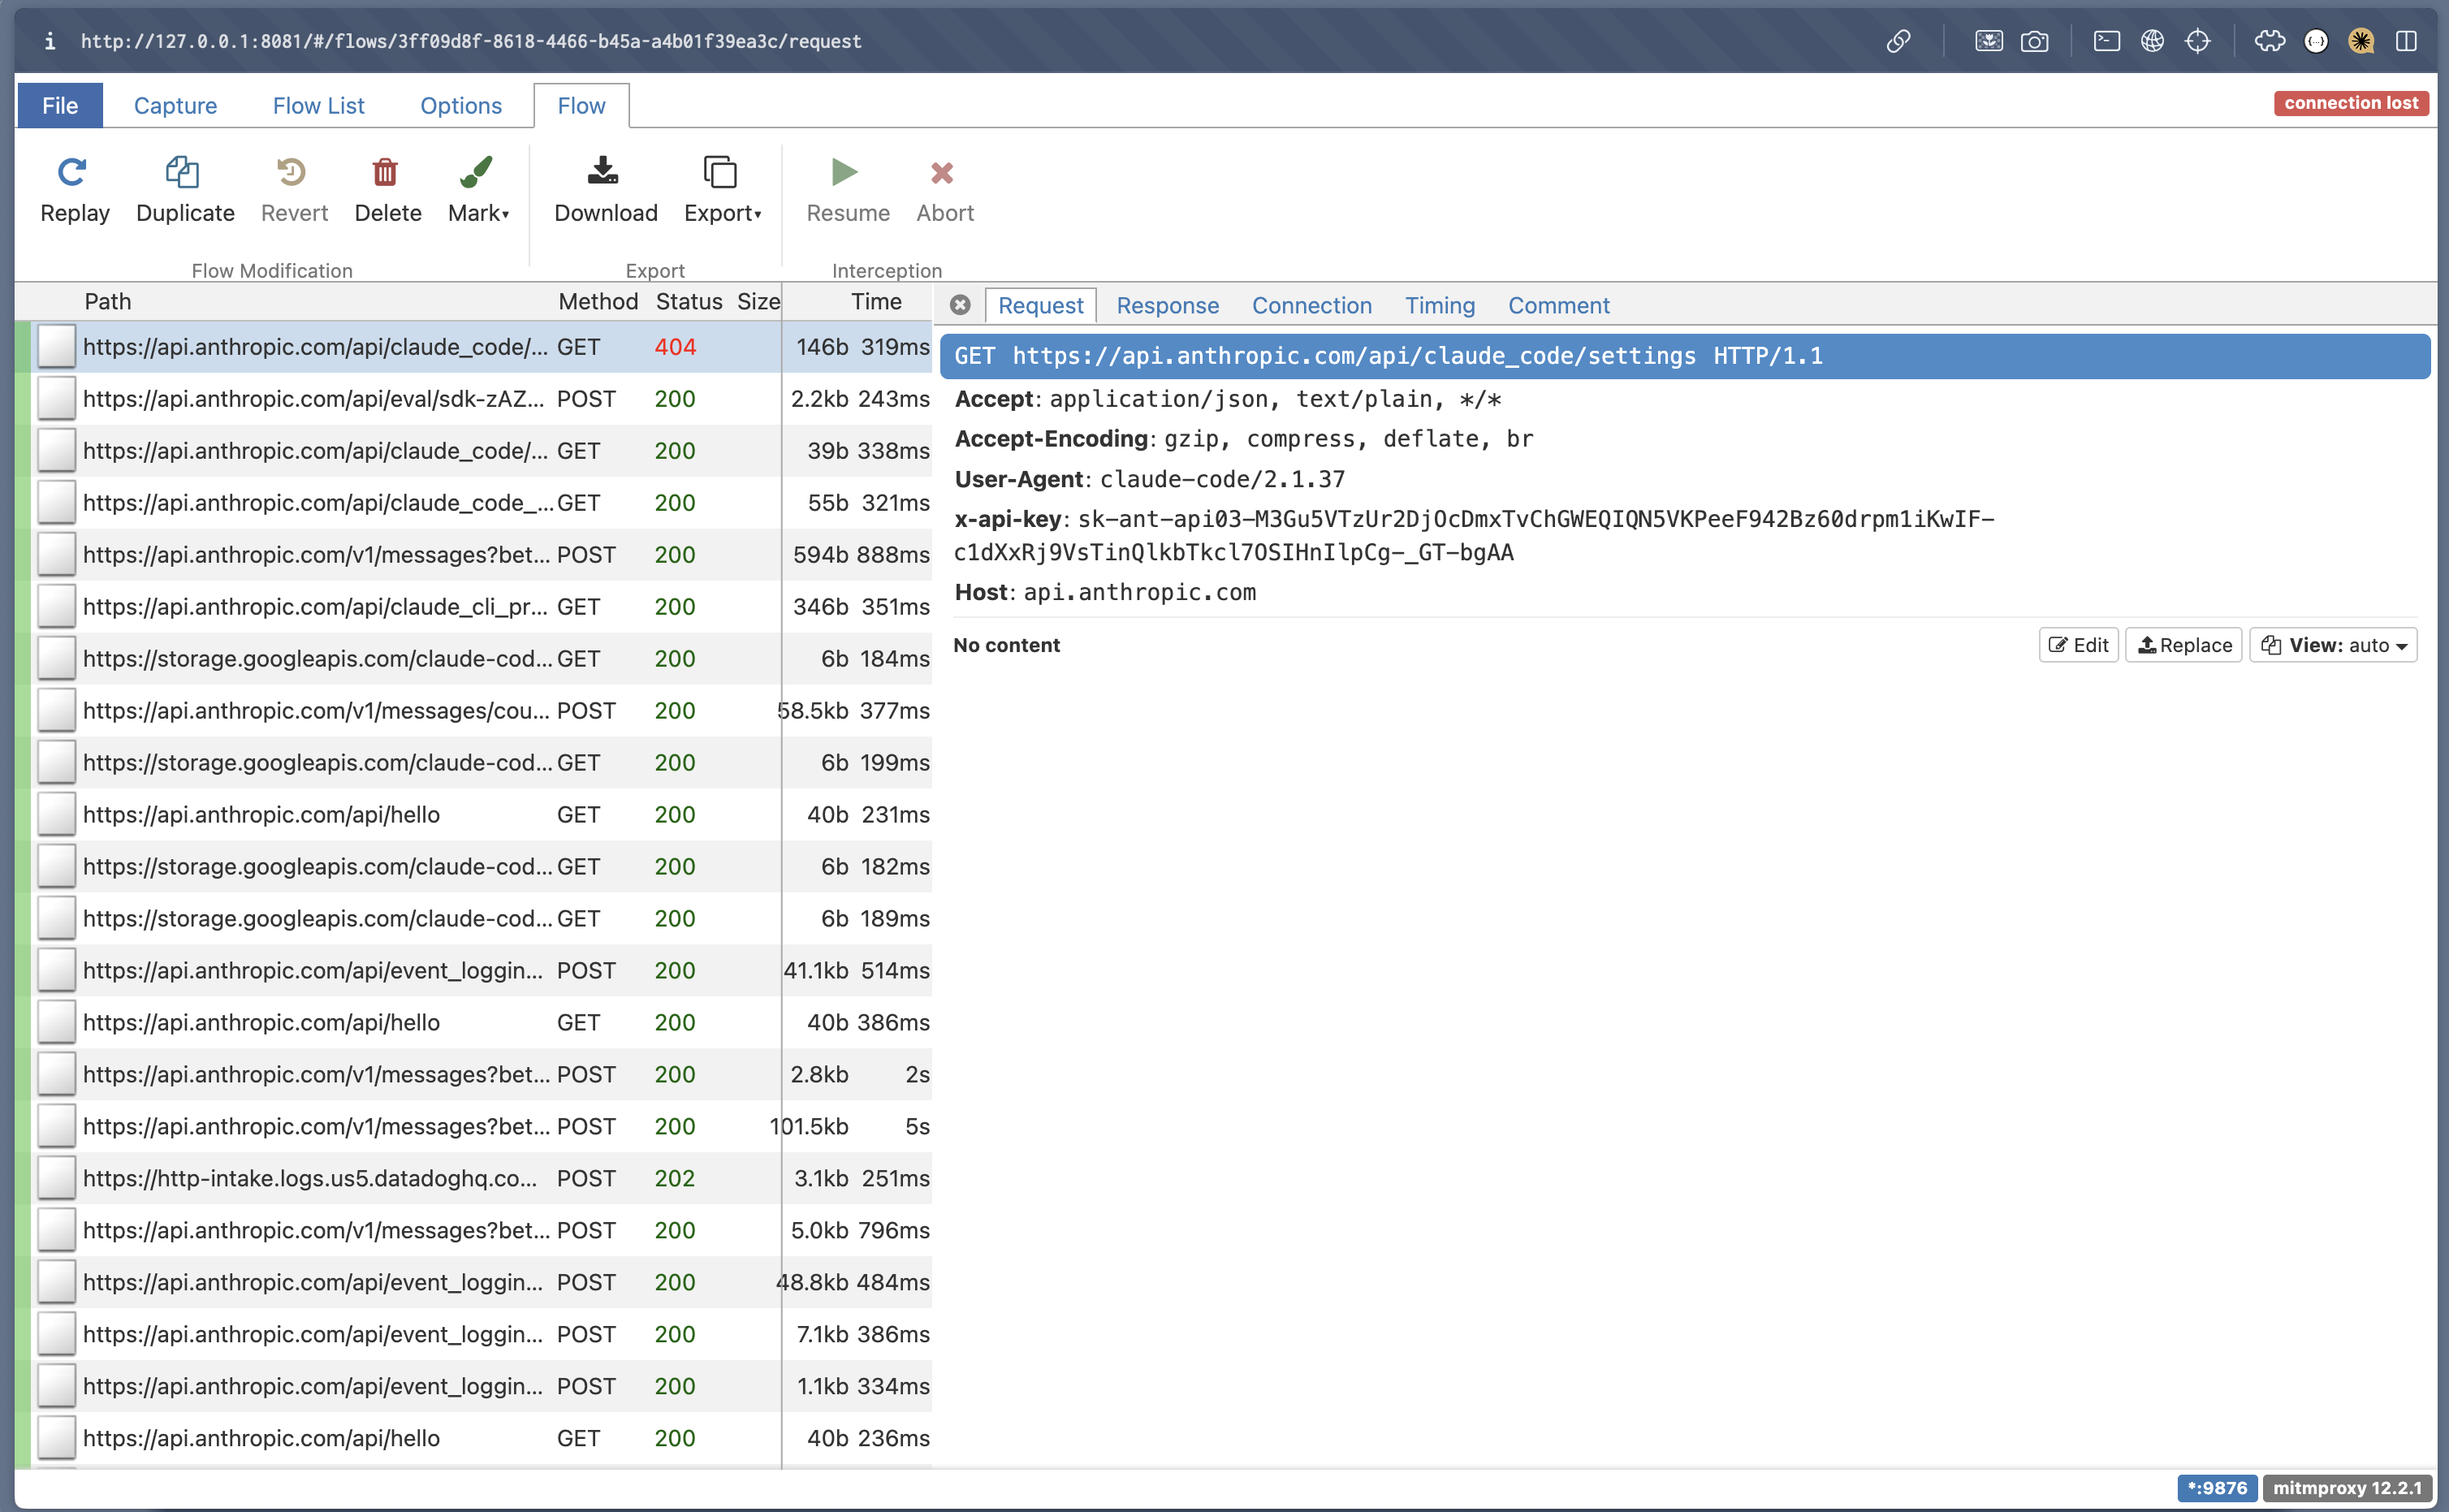
To understand what messages were sent to the LLM, I set up mitmproxy, a HTTP proxy, to intercept the requests that Claude Code was sending back to the server. If you’d like to inspect your own Claude Code sessions, I’ve included the mitmproxy setup steps at the end of this article.
Culprit Identified: Verbose Logging Was Enabled
Some interesting observations that I discovered when introspecting the requests sent to the Anthropic server were:
- The entire
tool_resultmessage is included in the context conversation which means every tool output gets appended to the model’s context window on every subsequent request (if you’re unfamiliar with context windows, I have written a post about why context management matters here). One example oftool_resultis the output of a tool call such as abashcommand that Claude Code was executing. - Every now and then, a
<system-reminder>message would be injected into the conversation to remind Claude to check for malicious behaviour. - For each message, Claude Code calls the
/messages/count_tokensendpoint to calculate the number of input tokens.
While looking at those requests, I found that one message was Claude attempting to validate the implementation by running go test -v by default. On top of that, there were a lot of database logs which resulted in a lengthy stdout of ~10k tokens altogether. Since the entire tool_result gets added into the conversation context, all that verbose output was quietly burning tokens in the background. Turns out, one default flag -v is enough to make Claude token-hungry.
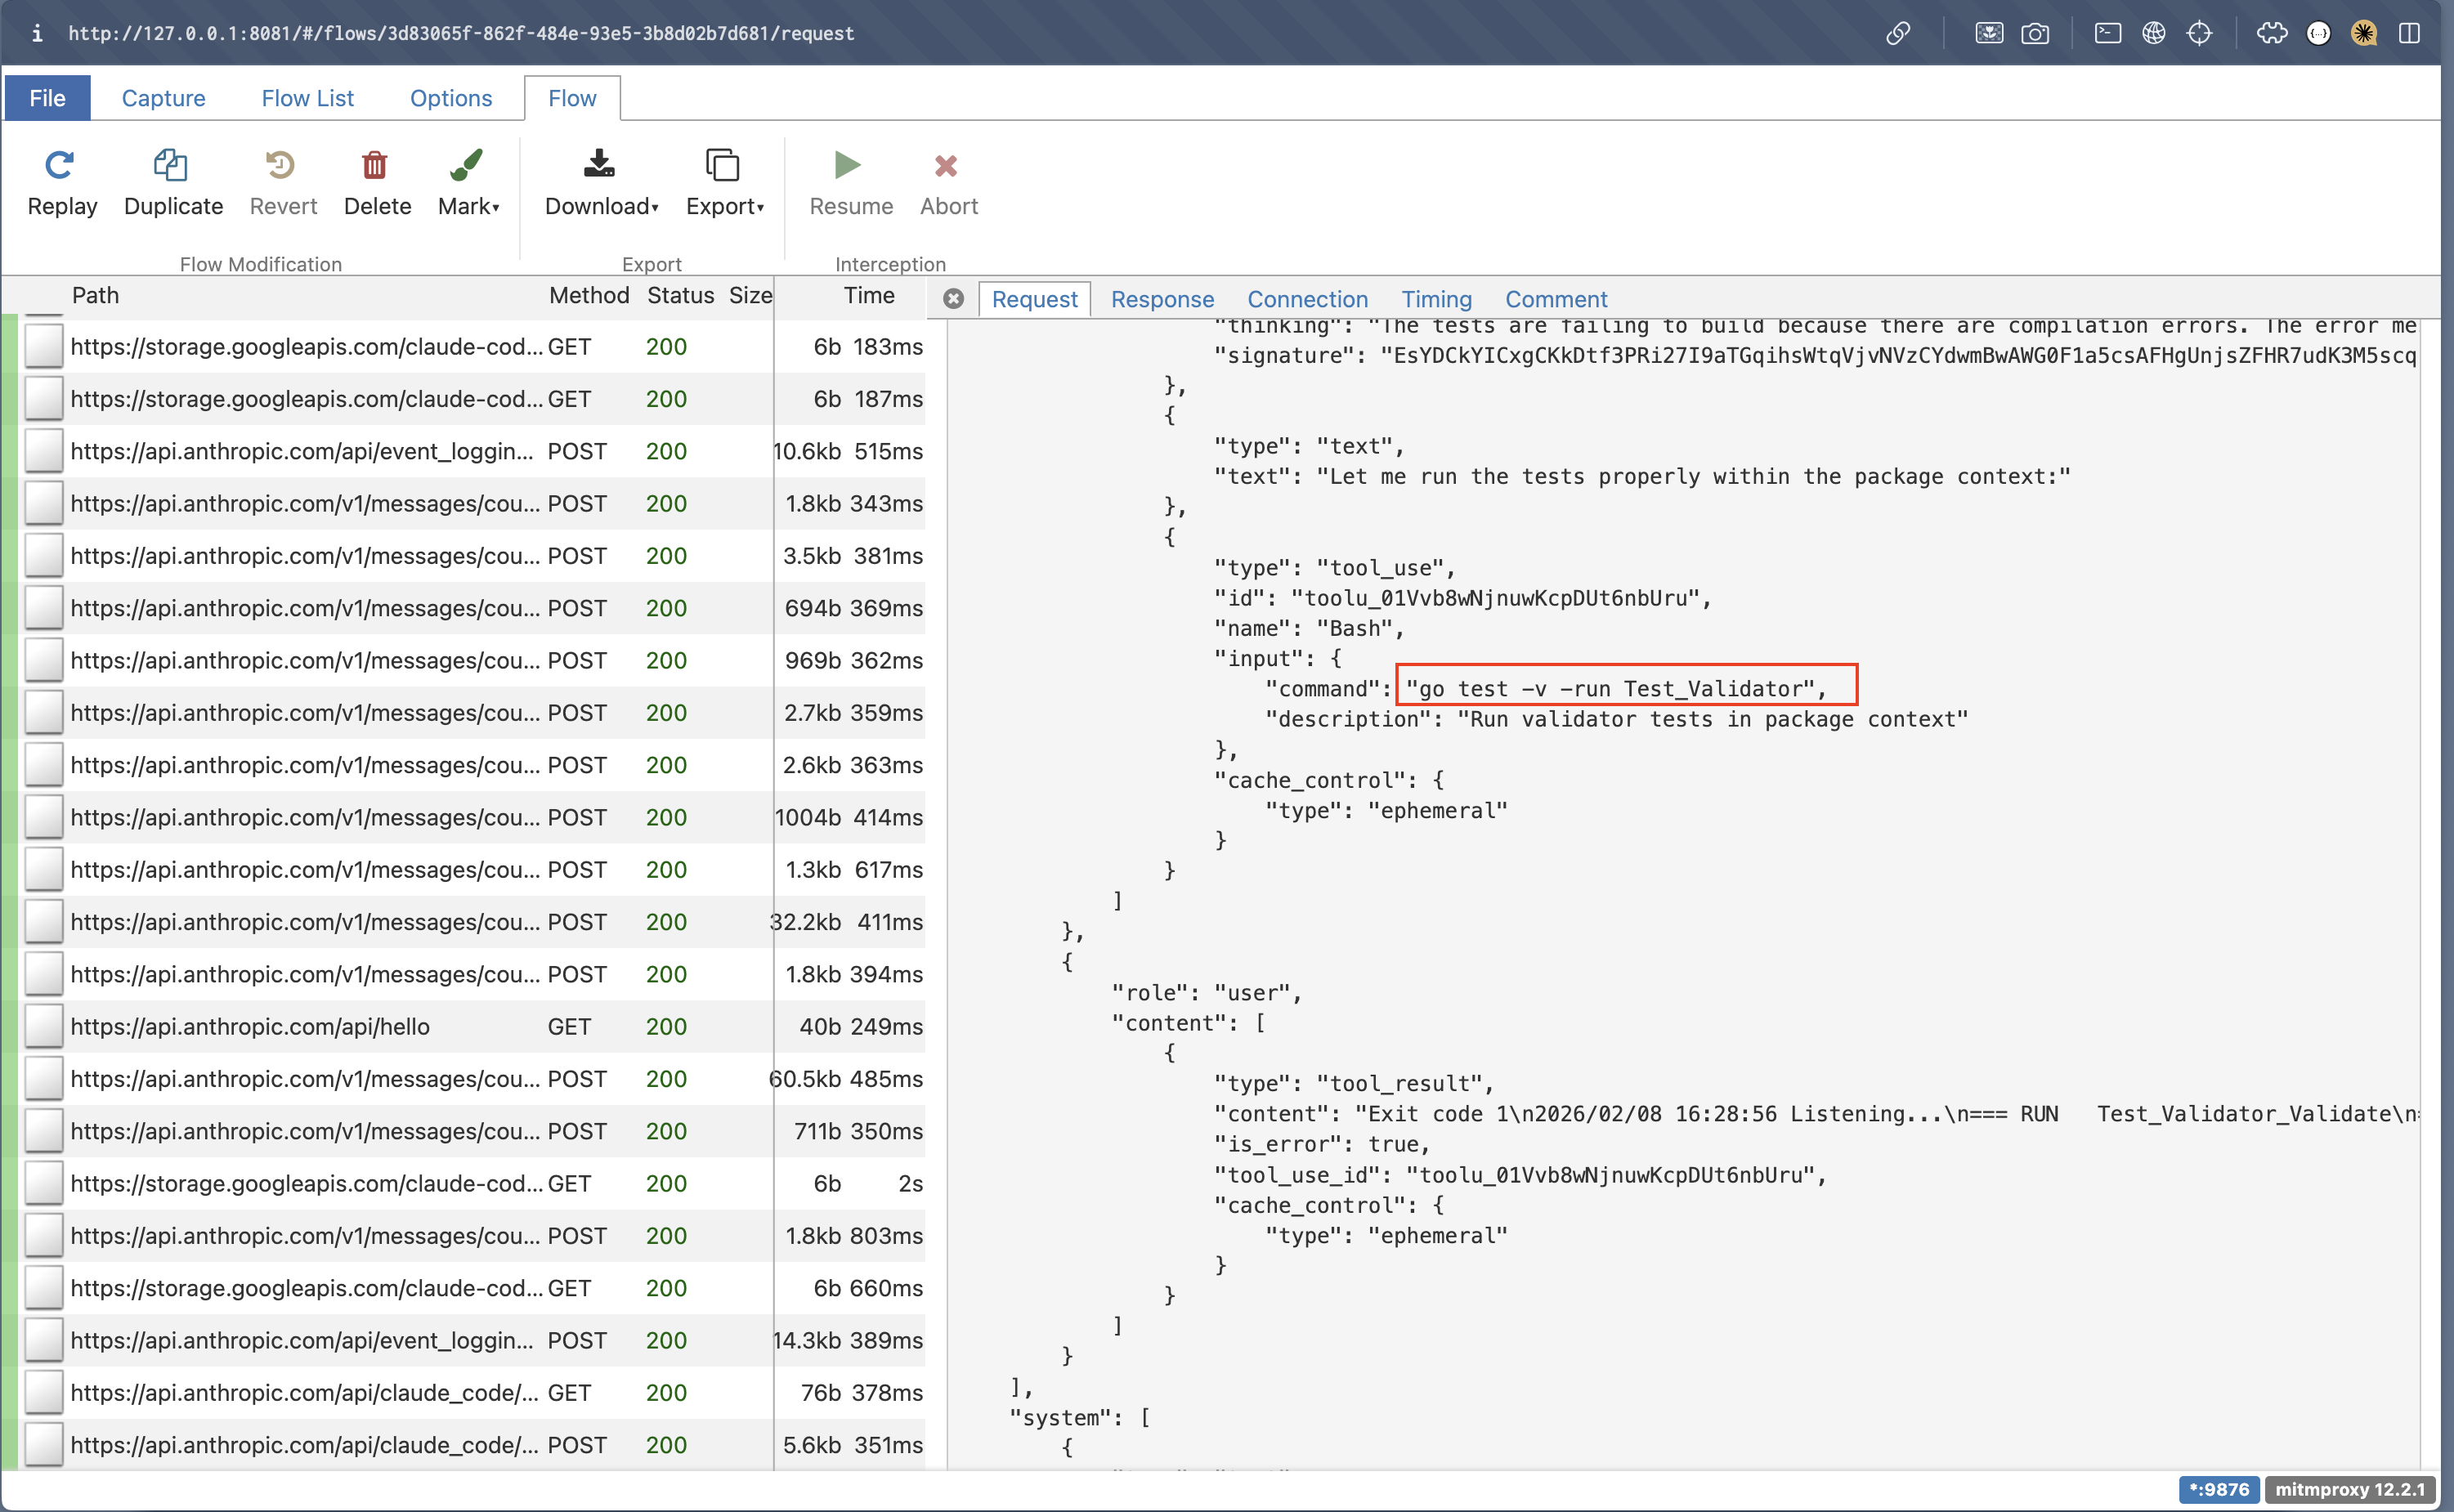
For the purpose of keeping this article simple, I’ll be using examples that I ran on the go-jwt to explain further. The screenshot below shows the requests that the mitmproxy intercepted and notice that Claude runs go test with the -v flag by default which enables verbose logging.
By enabling verbose logging, it lists all the tests that ran and its results. However, what’s important for Claude in this context is whether there are any tests that have failed and why which makes enabling verbose logging unnecessary, causing tokens to be burned.

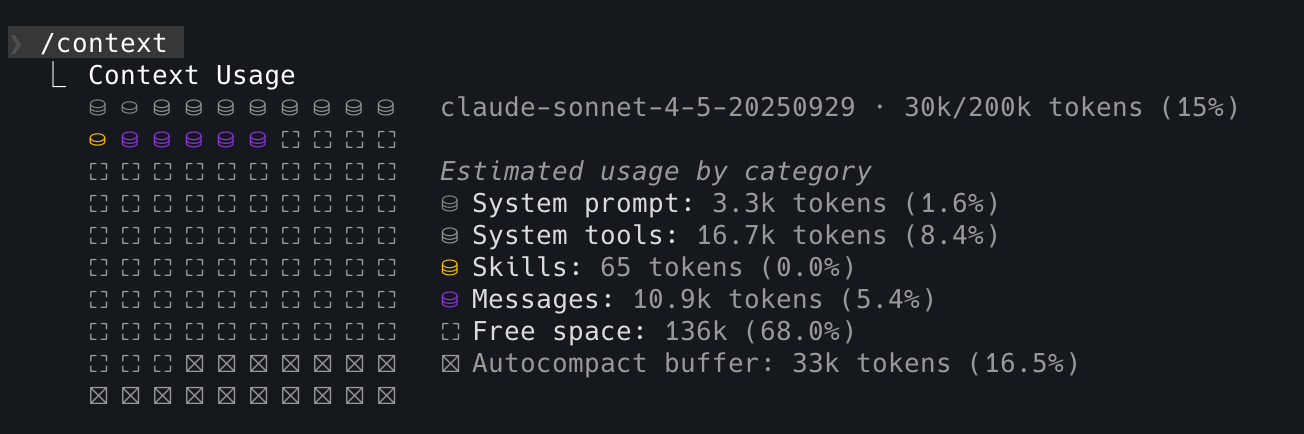
This particular session to validate the tests took up 10.9k tokens.
Why This Compounds Faster Than You’d Expect
While 10k tokens per test seems manageable, this could add up quickly to cost because:
- Each test output remained in context for subsequent turns
- Tests could run multiple times as we iterate on fixes, creating a compounding effect
- Context is bloated with information that provides almost no value to the LLM
Putting Claude on a Token Diet
Now that the cause of unnecessary tokens burned has been identified, we can practice log hygiene by providing specific instructions to Claude in CLAUDE.md to not enable verbose logging.
## Instructions for Go codebase

If you need to validate if all tests have passed, you MUST only run with `go test` WITHOUT the verbose `-v` flag to reduce token consumption.
After providing specific instructions to Claude, a few things have changed:
-
It now runs
go testwithout enabling verbose logging.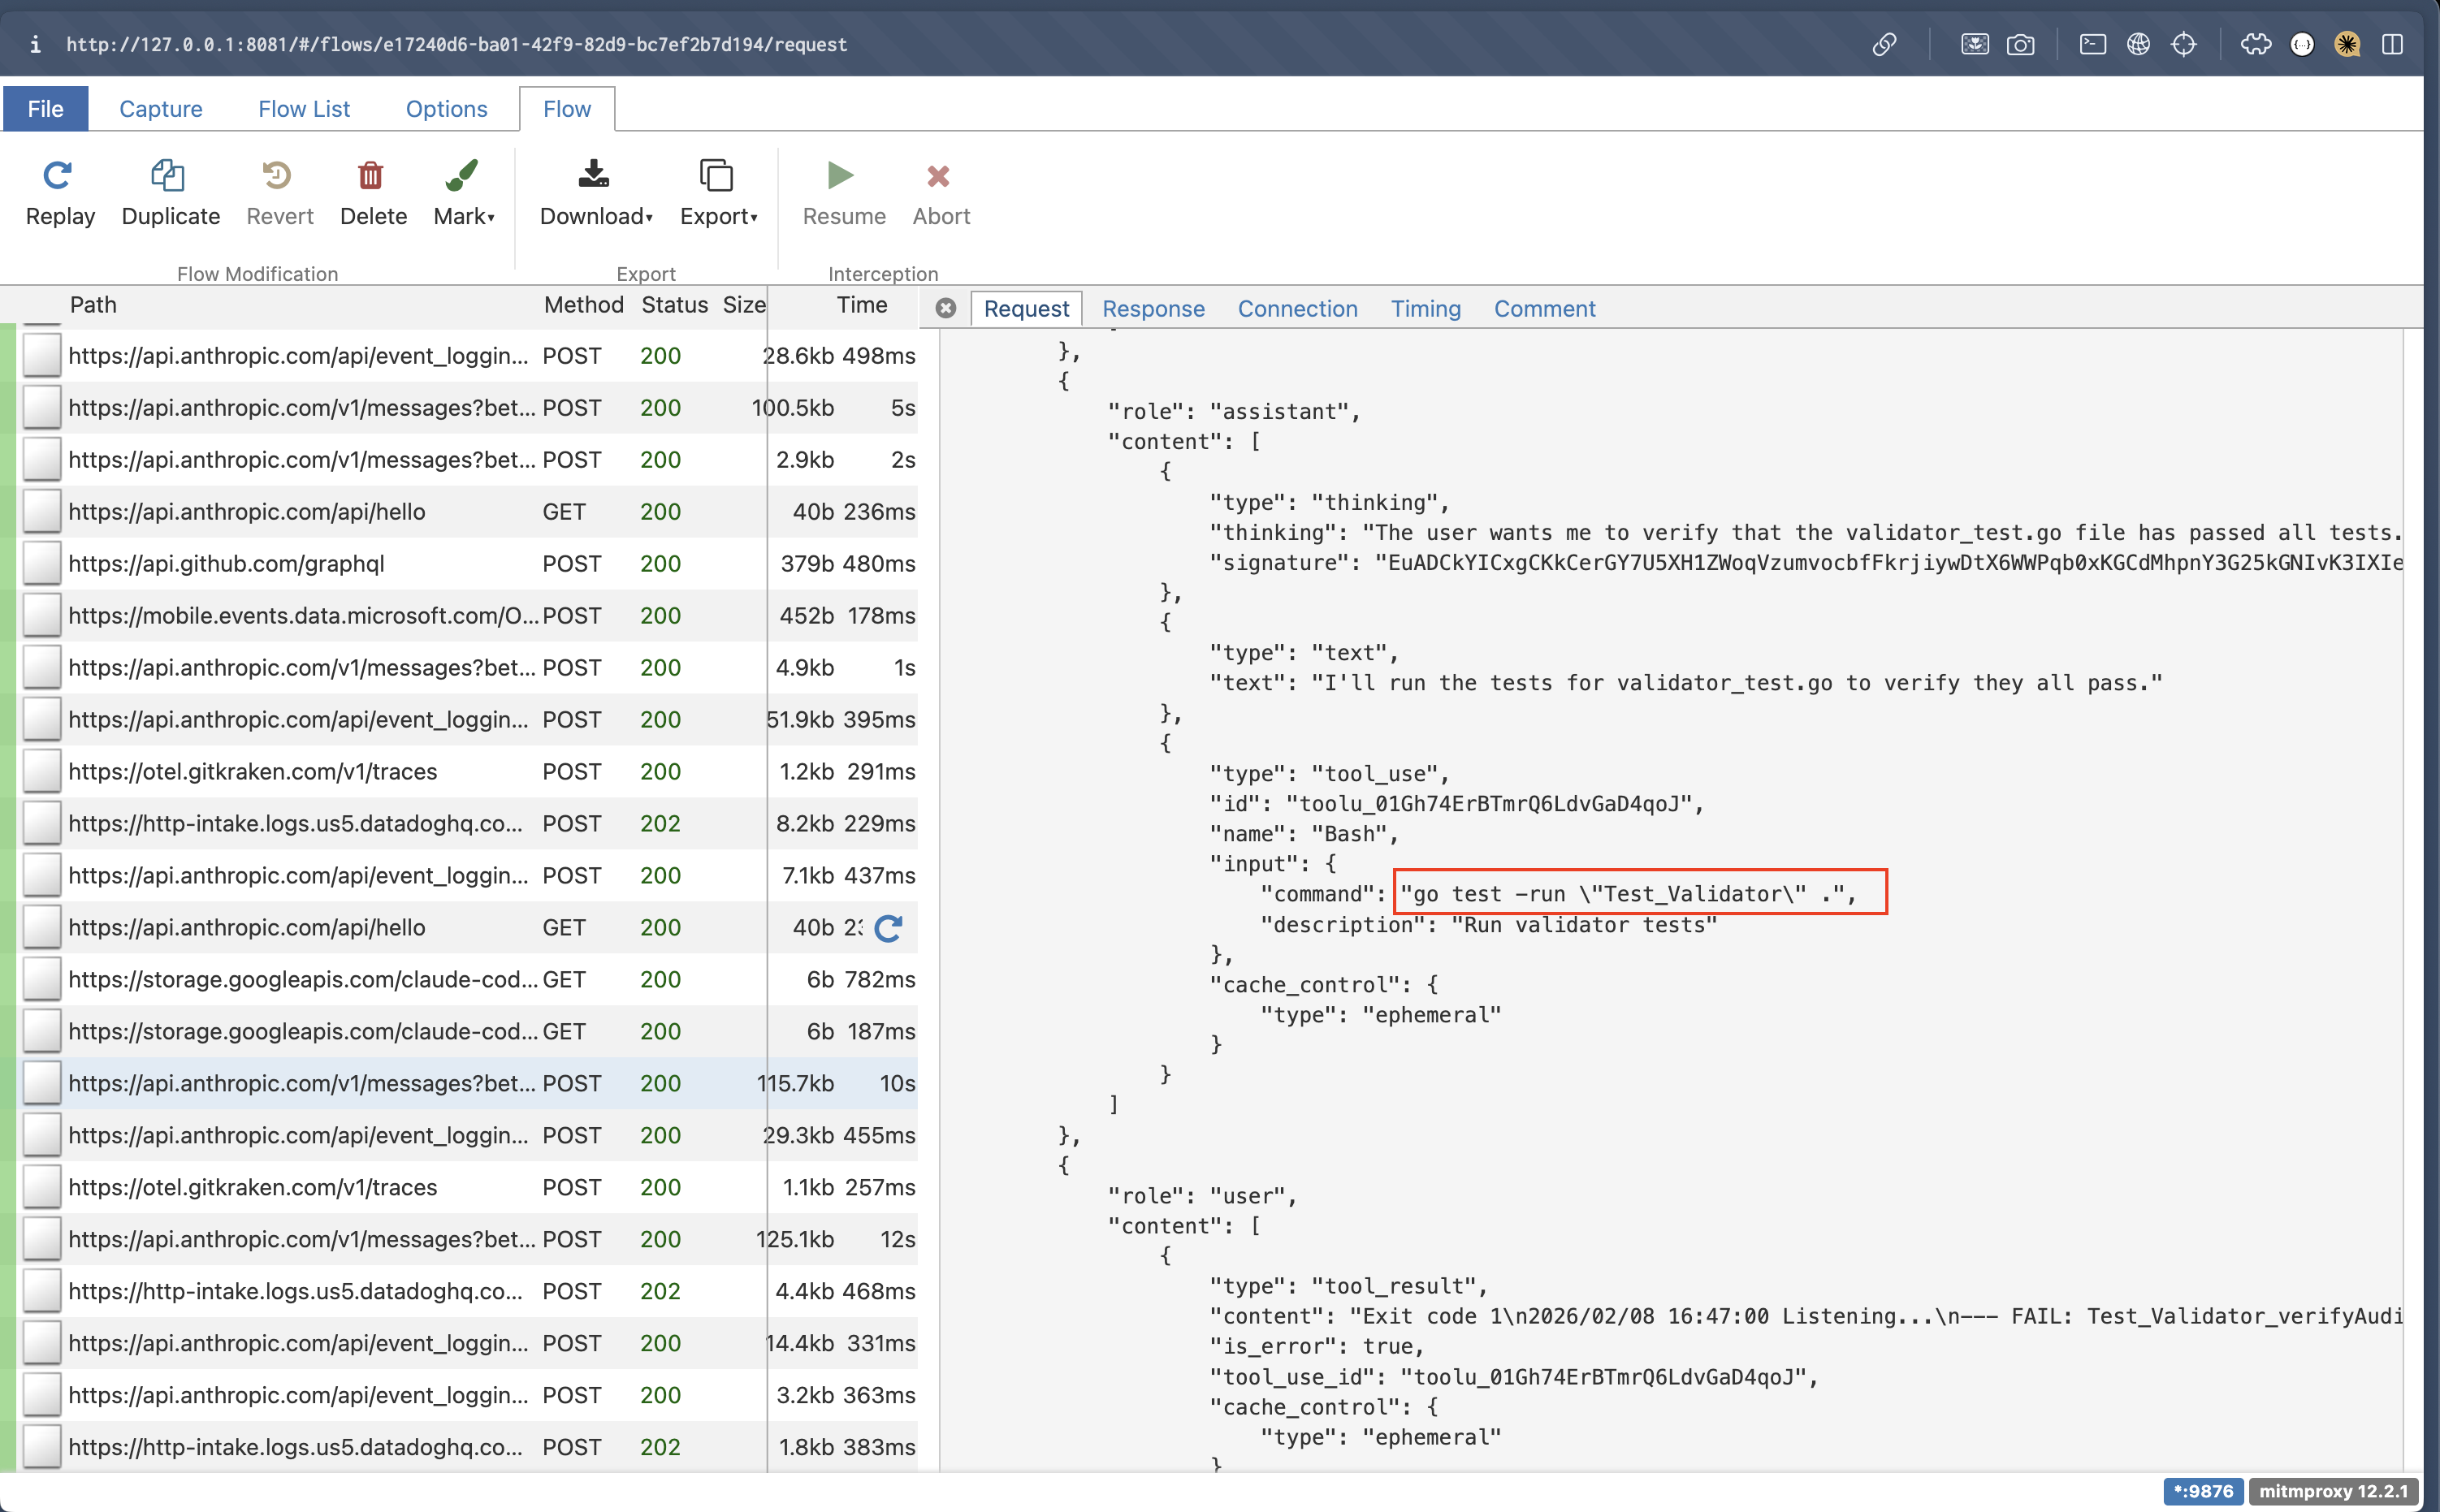
-
Even without enabling the verbose logging,
go testdisplays the tests that have failed by default which gives Claude just enough context about why they failed with fewer tokens.
-
Only 8.6k tokens are consumed which means 21% (2.3k) of the tokens are saved 🎉
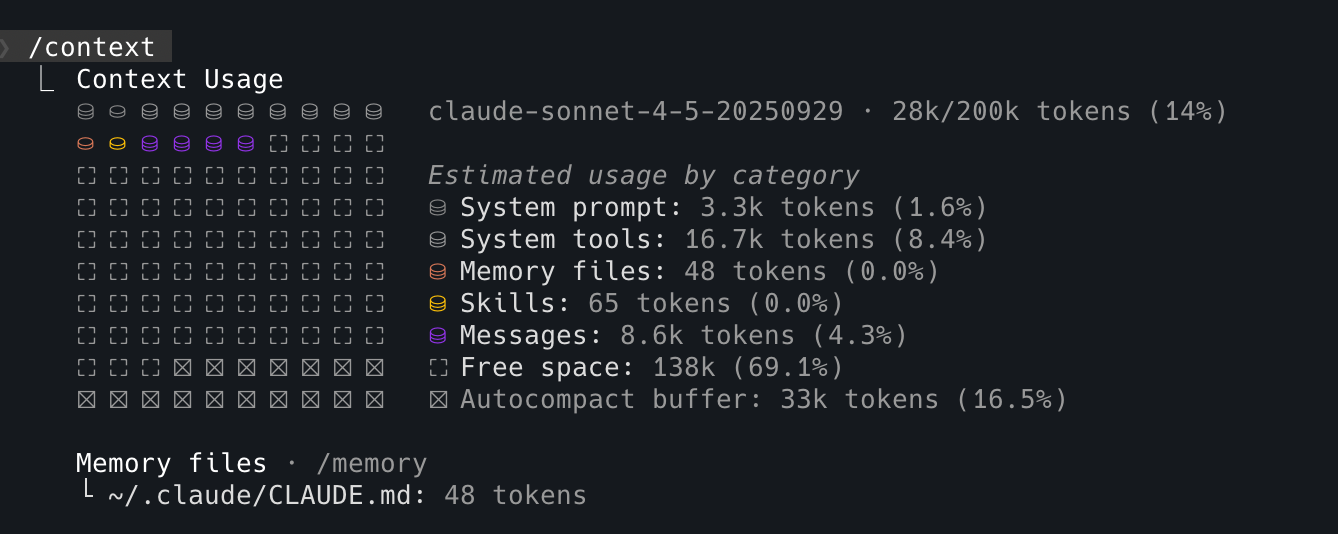
With this CLAUDE.md enhancement, Claude Code will gather just enough context from go test to fix failing tests without consuming additional tokens on passing test suites, reducing unnecessary costs.
I’ve also updated the test environment to use the appropriate log level, error, to prevent noisy database logs from being added into the context window when running tests. The same concept can be applied for each tool that Claude executes such as scripts and linters. A good litmus test here would be to ask yourself if you’d read the stdout logs that were produced? If the answer is no, then it’s probably not worthwhile for those to be added into Claude’s context window too.
Conclusion
In essence, to be able to work with AI-assistant tools like Claude Code effectively, it’s very beneficial to understand its behaviour and abilities to be able to get the most out of it.
Claude adds the entire tool_result into the conversation context hence one way to optimise context management and cost here is to ensure you practice log hygiene. The verbose flag was the culprit this time, but who knows what else could make Claude go token-hungry?
If you’d like to reproduce this investigation, here’s how to set up mitmproxy.
Try It Yourself: Setting Up mitmproxy
Here are the steps which you can follow to set up mitmproxy to introspect the requests sent to the LLM.
Step 1: Install mitmproxy
See installation guide here.
Step 2: Generate CA certs
After installing mitmproxy, you’d need to run mitmproxy first to generate the keys for certificate authority (CA) in your local directory.
mitmproxyStep 3: Configure mitmproxy
Once the keys have been generated, you’d need to define the following variables in ~/.claude/settings.json so that mitmproxy can act as a trusted source to be able to intercept and decrypt HTTPS traffic. These are system variables so you should configure them specifically in Claude’s settings file to avoid interfering with other proxy settings that you might have in your device.
You would need to:
- Define the full file path for
SSL_CERT_FILEwhich was generated in Step 2. - Configure the proxy server for Claude Code. I am using port
9872but you can choose any other available port number.
"env": {
  "SSL_CERT_FILE": "/path/.mitmproxy/mitmproxy-ca-cert.pem",
  "HTTP_PROXY": "http://127.0.0.1:9872",
  "HTTPS_PROXY": "http://127.0.0.1:9872"
}
Step 4: Start up your mitmproxy server
I prefer using mitmproxy’s web UI, but they also support command-line if that’s your jam. If you’re using the web UI, the following command should automatically open up the mitmproxy in a browser page.
mitmweb -p 9872Step 5: Verify your set up
Start up Claude Code and you should be able to see the requests getting intercepted.