Introduction
Claude Code has evolved so much since I first started using it that my workflow has evolved with it too. I first started out by writing prompts like “Implement the CreateUserEventHandler which consumes the ‘CREATE_USER’ event, and it should also account for idempotency”. It was pretty rudimentary as I have to repeat a similar prompt each time I’m implementing a feature, and there were lots of back of forth in terms of the implementation detail which became unproductive 😅
In the past few months, I’ve been exploring and experimenting ways to improve my development workflow for productionised systems and eventually landed on a workflow that I can easily reuse for feature-oriented tasks. In this article, I’ll be sharing more about the AI-assisted engineering workflow that I’ve set up and what my experiences with it so far are — both the positives and challenges.
Optimising Feature Delivery with Claude Code
Since I spend a lot of my time on feature delivery, I wanted to find a way where I could leverage on Claude Code to help me work more efficiently here.
The Expectations
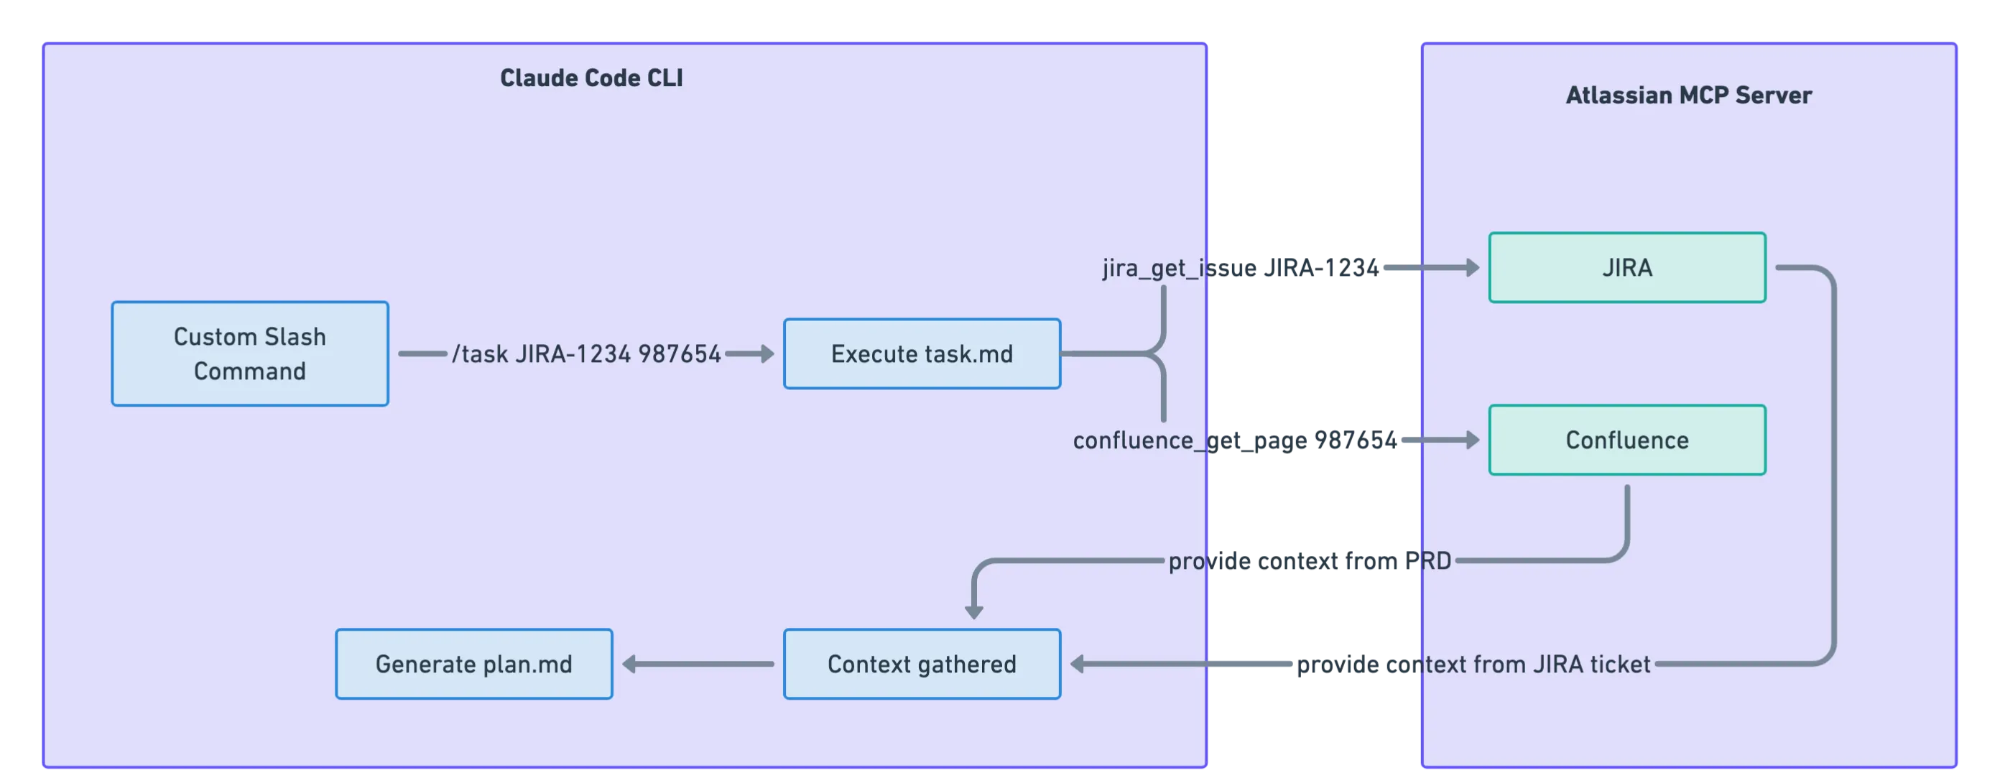
For some context, I have product requirement documents (PRD) living in Confluence, and the technical implementation is broken down into JIRA tasks. I eventually landed on a workflow that connects Claude Code to Atlassian’s MCP server, fetching information from the JIRA ticket I’m working on and the related Confluence document where the problem statement, acceptance criteria and description of the feature are documented. This gives Claude the context it needs about the feature I’m building.
What I envision here is reducing implementation time while still ensuring business logic remains accurate and reliable—especially robustness of the implementation such as good error handling and addressing race conditions.
Discover-Define-Deliver Workflow
I adopted the D3 (Discover-Define-Deliver) framework in this workflow as illustrated in the diagram below, and I’ve set up a custom slash command where I could easily execute the workflow with /task. More on how this setup is implemented would be elaborated further in the Workflow Set Up section.
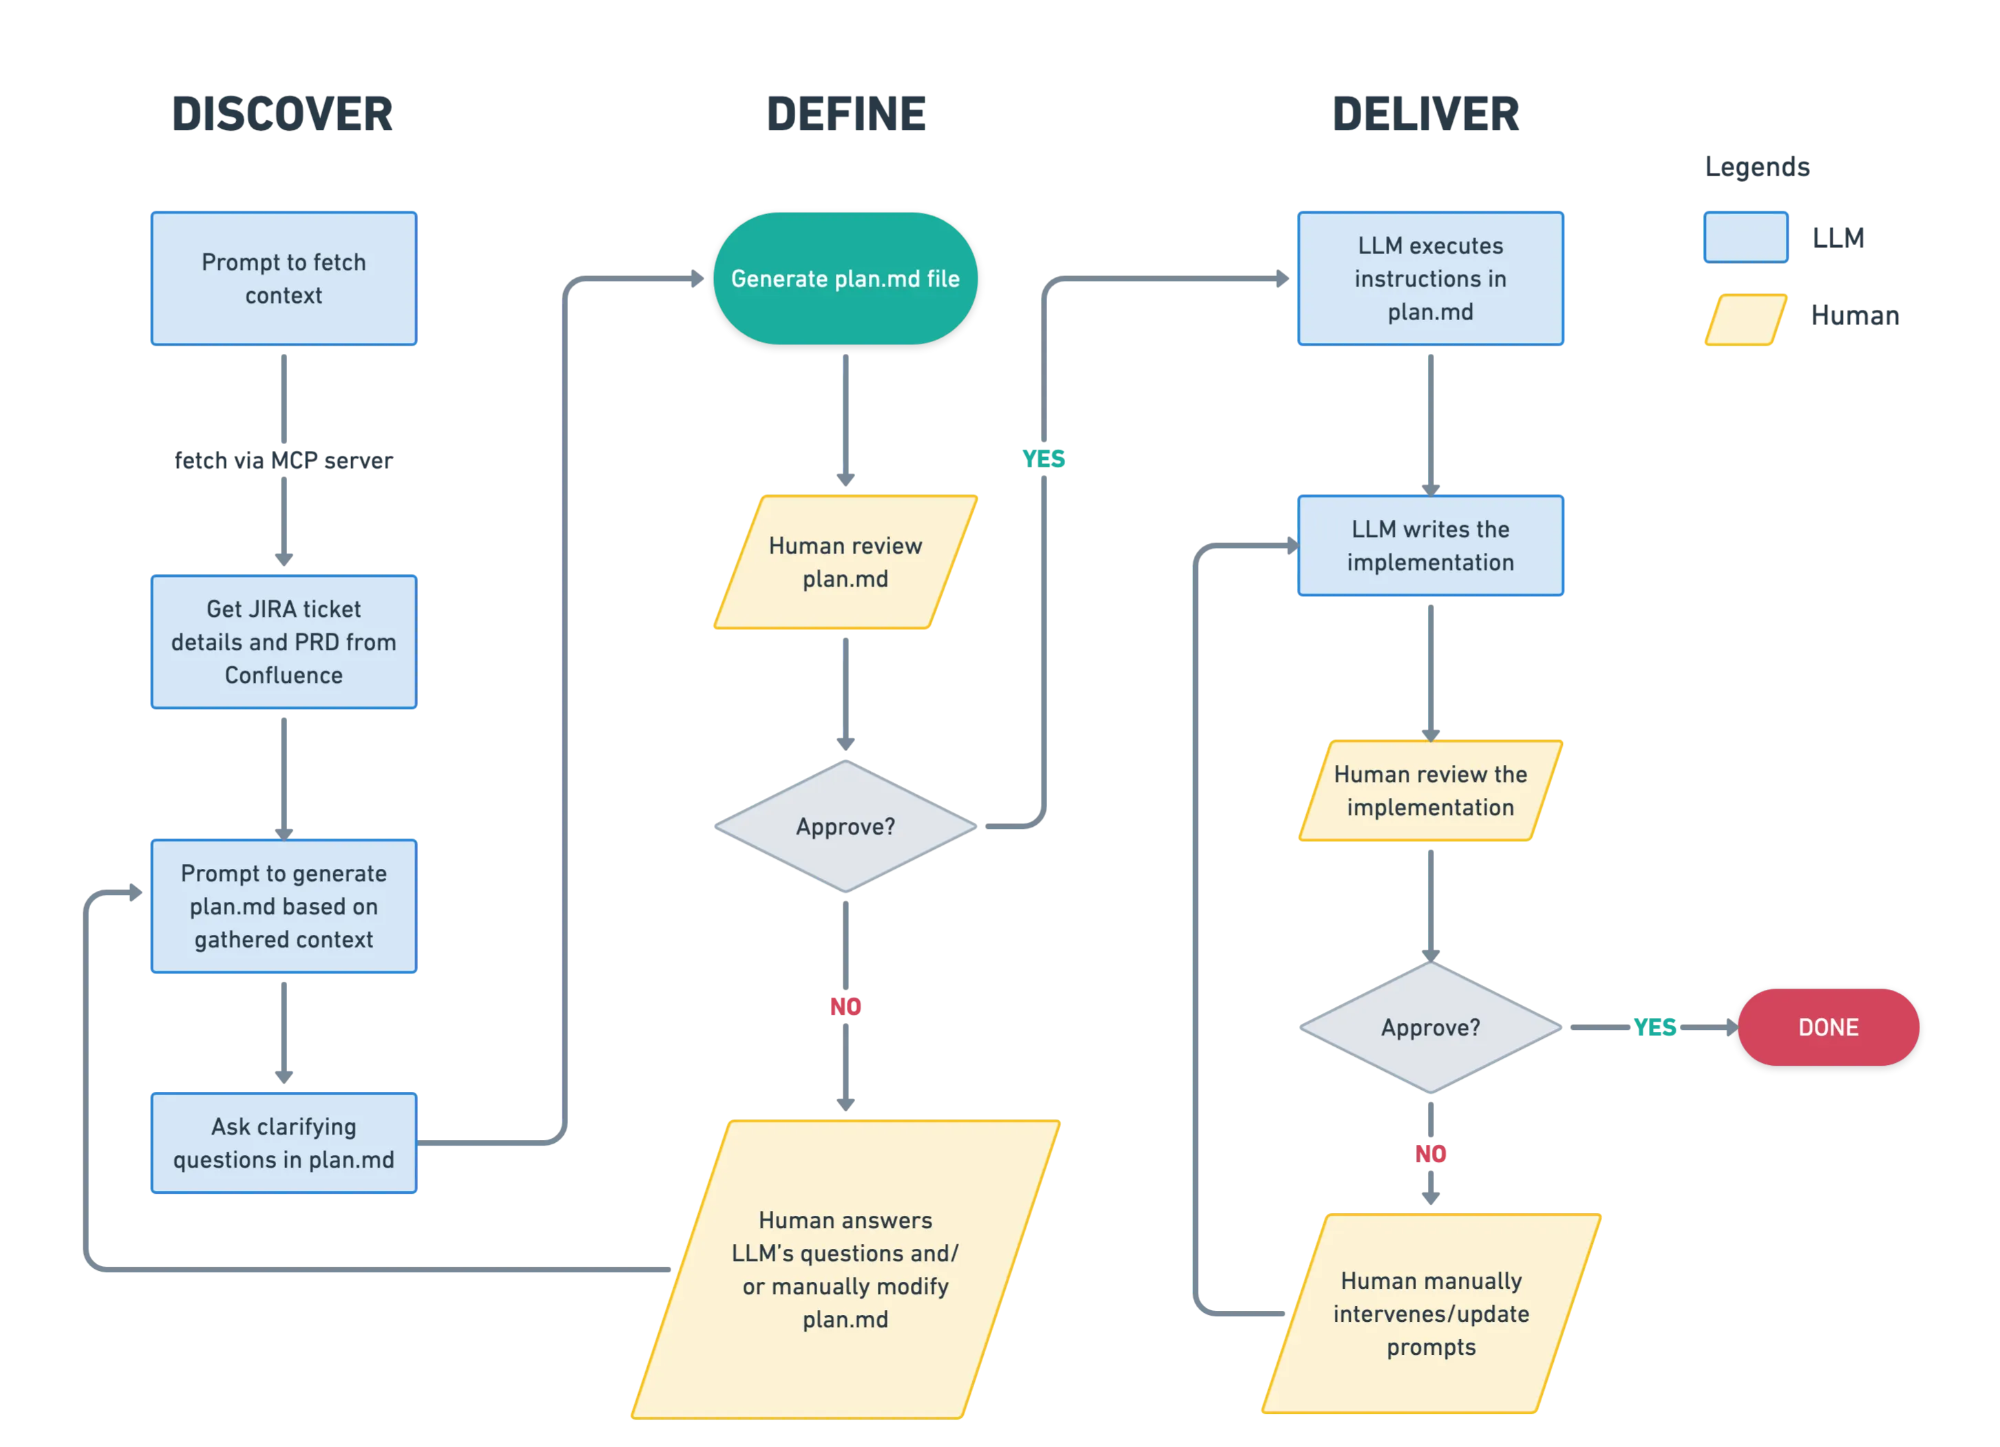
The workflow is broken down into 3 steps:
- Discover — This step allows Claude to have the autonomy to gather context and understand the codebase better, while prompting it to ask questions if they need more clarification based on ambiguities it finds
- Done by: LLM
- Define — This step allows the human to collaborate with Claude to ensure that the plan is well defined and correct. The human provides clarity to Claude’s questions and Claude will make the necessary amendments to
plan.mdaccordingly before proceeding.- Done by: LLM with validation from a human
- Delivery — This step is iteratively executed by the LLM to implement the feature based on
plan.mdand human review is still required to approve the final deliverables- Done by: LLM with validation from a human
The Reality
Claude’s ability to discover nailed it for me
Claude’s discovery capabilities have genuinely impressed me. As the source code that I work on is really huge, it’s impossible to have knowledge of every nook and cranny of the codebase. This was where Claude Code really shined for me. On several occasions, Claude identified existing functions I could reuse—functions I didn’t even know existed in our codebase. This saved me some time from re-implementing something that already exists in the codebase.
My time spent shifted from writing code to validating
With this AI-assisted engineering flow, I still find myself spending a bulk of my time understanding the work of the LLM, form my own judgment and validate if it’s really production-ready.
Perhaps I’m still cautiously optimistic when it comes to AI and maybe the model will only get better. But how I see it is that the development flow now closely resembles the PR review stage where the skill to read and understand code is more important than ever, and validating that edge cases are covered. I recall being pushed to review code in my very first week on the job as a fresh grad. I now appreciate that early push to hone this skill, rather than waiting until I was “senior enough” or had “enough domain knowledge.”
Drawing parallels from pre-AI era
Before AI-assisted engineering, would you review a PR from an exceptionally talented engineer before approving it? If your answer is yes then I think a similar mindset can be approached for assessing a LLM’s output too! Beyond validating production-readiness, the review stage is where learning happens too. Now that models have improved significantly, their output is much more review-ready.
Now back to what I initially envisioned when I created this flow. Would the time needed to deliver a product feature be reduced? Yes I think it has. Having a clearly written PRD and well defined JIRA ticket would make this even more viable too.
Workflow Set Up
If you want to try this workflow yourself, this section covers how you can set it up. This setup is specifically for Claude Code, though tools like Gemini CLI also support MCP configurations and custom slash commands too. If you’re using Notion or Linear instead of JIRA, you can easily modify this set up to fetch from Notion or Linear’s MCP server too.
Configure Atlassian MCP
In ~/.claude.json, add the Atlassian MCP configurations to your respective project.
"mcpServers": {
"atlassian": {
"type": "sse",
"url": "https://mcp.atlassian.com/v1/sse",
"env": {
"JIRA_URL": "https://<your-jira-domain>.atlassian.net",
"CONFLUENCE_URL": "https://<your-confluence-domain>.atlassian.net/wiki"
}
}
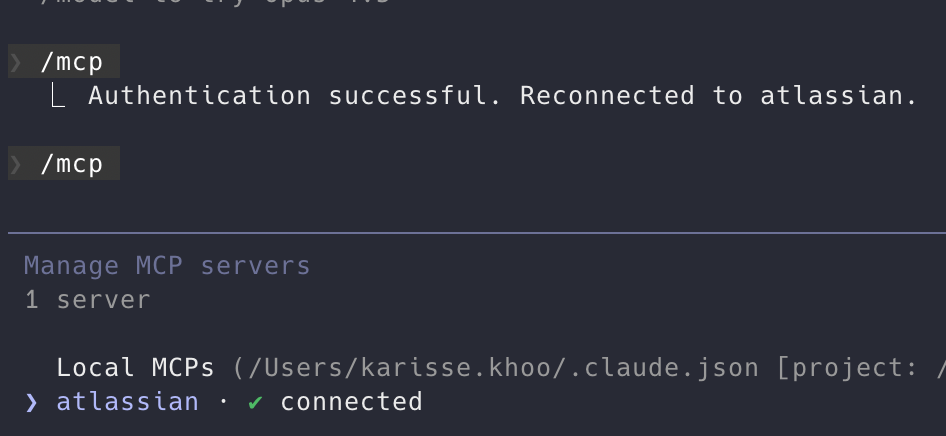
}To verify if your set up has successfully authenticated with Atlassian, run /mcp and you should see that you’re connected!
Configure Custom Slash Command Prompt
I created a task.md file in ~/.claude/commands which contains the prompt to allow Claude to discover information and define the plan needed to execute the task. By adding the task.md file, it sets up the custom /task command with Claude Code.
Note that the below syntax is in markdown format. Tools like Gemini uses TOML which requires you to adjust the prompt syntax accordingly.
# Execute task

Work on JIRA ticket: $1

## Instructions

1. Read the ticket

First, use the "getJiraIssue" tool from Atlassian MCP to fetch and understand the JIRA ticket issueKeyId $1:
- Get ticket details. Only request for fields like title, description, and linked tasks.
- Review any comments.

2. Read the PRD

If $2 is provided, you need to understand the product requirements.

- Use the "getConfluencePage" tool from Atlassian MCP to fetch the PRD from confluence pageId $2 and understand the contents and user stories inside the PRD
- Review the comments

3. Create a plan before executing the implementation

Based on the previous few steps, create a plan to summarise the feature to be implemented and include the acceptance criteria. Then draft the list of todos. These information should be stored in a `plan.md` file to be used for this session.

4. Allow user to review the plan

- Ask questions if you need further clarifications and add them into plan.md
- Prompt the user to review the plan and seek feedback before executing the TODOs.
Executing Task
The /task command expects 2 input:
- JIRA ticket number
- Confluence page id
To use execute the command, do the following:
/task JIRA-1234 987654This would fetch the details of ticket JIRA-1234 and page ID 987654 from Confluence. Interestingly, Claude also incorporates any prompts you’ve written in CLAUDE.md into the generated plan.md.
Seeing It In Action
I’ll be using one of the feature requests, raised in Excalidraw’s open source repository, to add an option to change the laser pointer colour purely as an example here for easy reference. The prompt would generate the plan.md as shown below. As you can see from the “Questions for Clarification” section, there’s still a lot of room for the human to drive the solution.
# Implementation Plan: Laser Pointer Color Customization

## JIRA Ticket
- **Key**: KTEST-1
- **Title**: Adding an option to change the laser pointer color
- **Status**: In Progress

## Problem Statement
The laser pointer tool currently uses a fixed red color with no option for customization. This limits visibility on certain backgrounds and reduces flexibility for users with different needs.

## Expected Behavior
Users should be able to change the laser pointer color, similar to how other drawing tools support color selection. This would:
- Improve visibility on red or dark backgrounds
- Help users align the laser pointer with their chosen color scheme
- Provide potential accessibility improvements for users with color vision deficiencies
- Enhance flexibility during presentations and screen sharing

## Proposed Approach
**Decision**: Reuse the existing color picker used by other tools (same as pen, highlighter, etc.)

## Acceptance Criteria
- [ ] Users can select a color for the laser pointer tool
- [ ] The selected color persists during the session
- [ ] The color change is visible immediately when drawing with the laser pointer
- [ ] The implementation follows existing patterns in the codebase for tool customization
- [ ] The feature works in both the library (`packages/excalidraw/`) and app (`excalidraw-app/`)

## Questions for Clarification
1. Should the laser pointer color preference be saved to localStorage/user preferences, or just persist during the session?
2. Should we implement the full color picker (Option 1) or a predefined set of colors (Option 2)
3. Should the laser pointer color be synced in collaborative sessions, or remain local to each user?
4. Are there any specific accessibility requirements or color contrast guidelines to follow?

## Implementation TODOs

### Phase 1: Research & Discovery
- [ ] Explore how other drawing tools (pen, highlighter, etc.) handle color selection in the codebase
- [ ] Identify where the laser pointer tool is implemented
- [ ] Understand the current laser pointer rendering logic
- [ ] Determine the appropriate state management approach

### Phase 2: Implementation
- [ ] Add color state property for laser pointer tool
- [ ] Integrate color picker UI (or predefined color options) in the toolbar
- [ ] Update laser pointer rendering to use the selected color
- [ ] Ensure color persists appropriately during the session

### Phase 3: Testing & Polish
- [ ] Test color visibility on various backgrounds
- [ ] Test in collaborative mode (if applicable)
- [ ] Run `yarn test:typecheck` to verify TypeScript
- [ ] Run `yarn test:update` to update snapshots and verify tests pass
- [ ] Manual testing across different scenarios

### Phase 4: Documentation
- [ ] Update any relevant documentation if needed
- [ ] Add code comments where logic isn't self-evident
I ran /cost which shows that this particular feature took Claude 10mins and 2.5USD to implement. One pretty cool nugget is that Claude is able to self-optimise by using the right model for the task. I’ve configured to use claude-sonnet-4.5, however, notice that a large number of input and output tokens are done using claude-haiku (for the Discovery step I assume).
 Usage by model:
    claude-haiku:  53.3k input, 15.1k output, 1.9m cache read, 121.7k cache write ($0.4737)
    claude-sonnet:  358 input, 20.6k output, 4.2m cache read, 131.4k cache write ($2.05)
You’re Ready!
Now you’re ready to give this a shot! This is only the third iteration of the prompt and I believe there’s so much more to be improved here to get the most out of it in a more cost-efficient manner. So go crazy with your experimentation and land on one that would fit your workflow the most.
Is This Workflow Applicable To All Cases?
There’s no one-size-fits-all solution. One case that I’ve found this workflow to have struggled was investigative tasks where only the problem was provided. The “Discover” step was either a hit or a miss. Earlier, I praised Claude’s discovery abilities when given clear feature context and acceptance criteria. But what happens when discovery falls short?
Since “Discover” is the foundation of this workflow, any misinformation here cascades into lengthy back-and-forth during the “Define” step—quickly becoming counterproductive. Perhaps a specific prompt for investigative tasks needs to be defined to improve Claude’s discovery for this case. I wouldn’t rely on it for providing the right solution either as I haven’t had much success there yet. Most of the time, I had to drive the solution myself.
Edit: Since Claude sonnet-4.6 dropped on 17 Feb 2026, I found significant improvements in its investigation findings after feeding it Grafana logs in comparison to sonnet-4.5 which was what I was using before. However, I still believe in the need to drive the solution and find the right solution to the problem ourselves instead of outsourcing the thinking to the LLM.
Conclusion
After a month of using this workflow on a productionised system, my biggest takeaway is that AI-assisted engineering fundamentally changes how we work rather than how much we work. The time I previously spent writing code has shifted to reviewing and validating AI-generated implementations.
This workflow works best when you have clearly defined requirements and acceptance criteria. For investigative tasks or ambiguous problem spaces, the traditional approach of human-led discovery still wins. But for feature delivery with well-written PRDs and JIRA tickets, Claude Code has genuinely improved my efficiency.
If you’re just starting off with AI-assisted engineering, build up your intuition for when to delegate versus when to drive. The D3 framework provides a solid mental model, but you’ll need to adapt it to your workflow, architecture and codebase characteristics too.
If anybody would like to chat about AI-assisted engineering, I’m more than happy to discuss more! Feel free to drop me an email at karissekhoojw@gmail.com :)